Internet knows No Borders. Email can reach anywhere in the world to anyone.
Marketing through email is a common practice now a day to promote business. Email marketing is a cost-effective way to target a large amount of audience.
A big business software is incorporated with email marketing application. It provides enhanced tracking and reporting services.
We have included this fabulous feature to our ERP.Gold. I will let you know in this article how easily and quickly you can create email campaigns in few steps for the promotion of your business.
Email Campaign
First of all, there is a Media center option on the left side of your dashboard. Media Center is like Leads but different it will record data of your Email Campaigns, Post Card Campaigns and Social Media.
- Email Listings
This listing will be added to the system if users want to add more members then they have to click on member’s list.
- Listing Name: This column will show email listing name.
- Subscribers: This column will show subscribers numbers.
- Open: This column will show a number of people who have opened your email.
- Clicks: This column will show a number of people who have clicked on your email.
- Date Created: This column will show the date of the record created.
- Member List: This button will show member list to users where they can perform different functions.
- Next Page Button: Users can view the record of next pages by clicking on arrow keys.
- Items per Page: Users can select how many items they want to see on one page available options are 5, 10, and 20.
- Refresh Button: This button will refresh the record.
2. Make a List
Decide who will receive your emails. Enter the email address to create a list to send emails to your targeted customers. Either you can upload an existing list from the system or create a list by adding members here.
- Upload from System:
- Upload from: Users will select the list from which they want members to be uploaded.
- Search Field: Users will enter search term from which they want member’s to be searched.
This Upload panel will upload CSV file from your system.
- Select Files: Users will select CSV files to be uploaded by clicking on this button.
- Upload: Users will upload the file by clicking on this button.
3. To add new members
- First Name: Users will enter the first name of the member in this field.
- Last Name: Users will enter the last name of the member in this field.
- Email: Users will enter the email address of the member in this field.
- List ID: This field will show ListID which will be auto generated by the system.
- Save Button: This button will save your record to the list.
- Back: This link will take you back to the Member list.
4. List is done
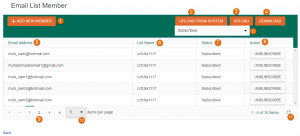
This is how your list will be shown when members are added.
- Add New Member: Users will enter new member data by clicking on this button.
- Upload From System: Users can upload members from the ERP GOLD system by clicking on this button.
- Upload: Users can upload members CSV file from their system by clicking on this button.
- Download: This button will download the on screen data in CSV file to your device.
- Email Address: This column will show email address list of the members.
- List Name: This column will show list name of the members.
- Status: This column will show the status of the member Subscribed means that member is already a subscriber.
- Action: This column will show action for the member users can Unsubscribe members by clicking on Unsubscribe button.
- Next Page Button: Users can view records on next pages by clicking on this button.
- Items Per Page: Users can select how many items they want to view on a single page from this drop down list available options are 5,10,20.
- Refresh Button: This button will refresh the record in the list.
- Member Status Drop Down List: Users can view the record of Subscribed or Unsubscribed members by selecting any of these two options from this drop down list.
5. Email-Campaign
Now you are ready to start your email campaign. This module will show Email campaign list and options for creating email campaigns.
- Add New Record: Users will add a new record to the list from this button.
- Campaign Title: This column will show campaign titles.
- Subject Line: This column will show Subject of your Email Campaign.
- Date Created: This column will show creation date of the campaign.
- Date Sent: This column will show the date when emails were sent.
- Status: This column will show the status of your Email campaign.
- Clicks: This column will show how many people have clicked on your email.
- Opened: This column will show how many people have opened your email.
- Unique Opens: This column will show how many unique opens were on your campaign.
- Action: This column will show Edit button next to each record user can edit data by clicking on this button.
- Next Page Button: Users can view record of next pages by clicking on arrow key.
- Items Per Page: Users can select how many items they want to view on single page available options are 5,10,20.
- Refresh Button: This button will refresh record on the table.
5. Email Format
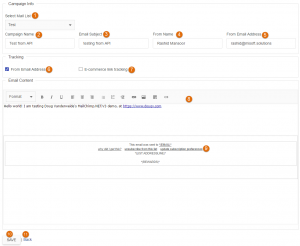
You can write content of your email and give it a proper professional email marketing format by including subject, footer and required standard information.
- Select Mail List: Users will select the Mail list from this drop down list.
- Campaign Name: Users will write the campaign name in this field.
- Email Subject: Users will enter subject of the Email in this field.
- From Name: Users will enter the name of the person which will appear as the sender.
- From Email Address: Users will enter email address from which email will be sent.
- From Email Address Check Box: Users will tick this check box if they want to track this email from email address.
- E-Commerce Link Tracking: Users will tick this check box if they want to track from E-Commerce Link.
- Email Body: Users will design email in the body formatting tools are available which will help you in designing your mail.
- Email Footer: Users will write customized footer message for the email in this section.
- Save: This button will save your email for the campaign.
- Back: This link will take you back to the mail index page.
Consideration:
Email marketing is effective to drive traffic to your products and services and generate sales. Email campaign generation is so easy and fascinating with ERP.Gold. You can create a great looking campaign in less than 10 minutes. So what are waiting for? Try our 90 days free trial to explore by yourself.


